데이터 과학
데이터 다수 다루기 - 파케이
학습 목표
- 다수 데이터를 일괄 처리한다.
do.call,assign함수를 사용해서 다수 데이터 파일을 불러 읽어들인다.
1. 다수 데이터프레임 덧붙이는 방법
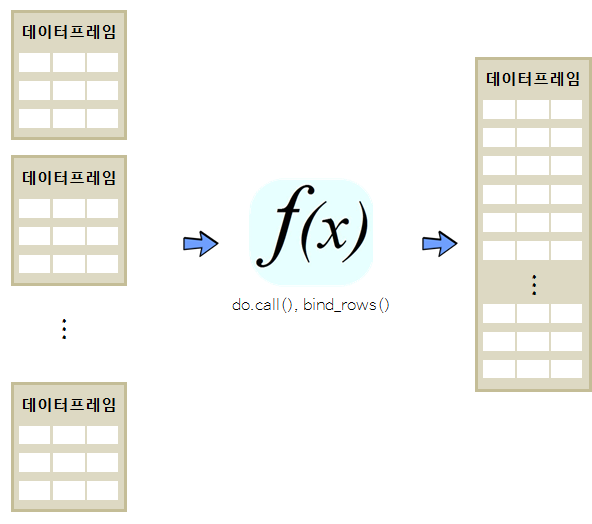
데이터셋 다수를 덧붙이는 경우는 실무에서 자주 등장하는 패턴이다. 예를 들어, 일별 데이터를 주별, 월별, 연도별로 분석하는 경우 데이터 변수는 변하지 않고 행만 추가되는 상황인데 실무에서 빈번히 마주하게 된다.
데이터 분석 국민 데이터 iris 데이터는 \(150 \times 3\) 크기를 갖는 데이터프레임이라 이를 iris_1, iris_2, iris_3 50개 관측점을 갖는 세개 데이터프레임으로 쪼갠뒤에 이를 병합하고 나서 identical 명령어를 통해 동일한지 검사한다.
데이터프레임을 덧붙이는 방법은 do.call 함수에 rbind 인자를 넣는 방법과 dplyr 팩키지 bind_rows 함수를 사용하는 방법이 있다. 두 가지 방법을 적용시킨 결과 동일한 산출값이 나오는 것이 확인된다.

# iris 데이터셋 크기 확인
dim(iris)
[1] 150 5
# iris 데이터셋 3등분
iris_1 <- iris[1:50,]
iris_2 <- iris[51:100,]
iris_3 <- iris[101:150,]

# 3등분된 iris 데이터프레임 합치기
iris_123 <- do.call("rbind", list(iris_1, iris_2, iris_3))
iris_dplyr <- bind_rows(list(iris_1, iris_2, iris_3))

# 원본과 대조필 01
identical(iris, iris_123)
[1] TRUE
# 원본과 대조필 01
identical(iris, iris_dplyr)
[1] TRUE
2. 다수 데이터 동시에 불러오기 1
mtcars 데이터를 GitHub에서 불러와서 이를 3등분한다. 3등분 결과 파일을 mtcars-01.csv, mtcars-02.csv, mtcars-03.csv 으로 로컬 파일로 저장한다. system 명령어를 통해 .csv 파일이 현재 작업 디렉토리에 정상적으로 생성되었는지 확인한다.
library(readr)Warning: package 'readr' was built under R version 3.2.5
mtcars.df <- read_csv("https://gist.githubusercontent.com/seankross/a412dfbd88b3db70b74b/raw/5f23f993cd87c283ce766e7ac6b329ee7cc2e1d1/mtcars.csv", col_names = TRUE)Parsed with column specification:
cols(
model = col_character(),
mpg = col_double(),
cyl = col_integer(),
disp = col_double(),
hp = col_integer(),
drat = col_double(),
wt = col_double(),
qsec = col_double(),
vs = col_integer(),
am = col_integer(),
gear = col_integer(),
carb = col_integer()
)
dim(mtcars.df)[1] 32 12
write_csv(mtcars.df[1:10,], "mtcars-01.csv")
write_csv(mtcars.df[11:20,], "mtcars-02.csv")
write_csv(mtcars.df[21:32,], "mtcars-03.csv")
# 파일생성 검증
system("dir")2.1. list.files + lapply 활용
list.files + lapply 방법을 조합한다. 즉, list.files 명령어로 .csv 확장자를 패턴으로 갖는 파일을 temp 변수에 저장하고 이를 인자로 넣어 read_csv 함수와 더불어 lapply 함수에 넣어 결과를 mtcars_lapply 리스트로 반환시킨다.

##================================================================================
## 02. 첫번째 방법: `list.files` + `lapply`
##================================================================================
temp <- list.files(pattern="*.csv")
mtcars_lapply <- lapply(temp, read_csv)Parsed with column specification:
cols(
model = col_character(),
mpg = col_double(),
cyl = col_integer(),
disp = col_double(),
hp = col_integer(),
drat = col_double(),
wt = col_double(),
qsec = col_double(),
vs = col_integer(),
am = col_integer(),
gear = col_integer(),
carb = col_integer()
)
Parsed with column specification:
cols(
  model = col_character(),
  mpg = col_double(),
  cyl = col_integer(),
  disp = col_double(),
  hp = col_integer(),
  drat = col_double(),
  wt = col_double(),
  qsec = col_double(),
  vs = col_integer(),
  am = col_integer(),
  gear = col_integer(),
  carb = col_integer()
)
Parsed with column specification:
cols(
model = col_character(),
mpg = col_double(),
cyl = col_integer(),
disp = col_double(),
hp = col_integer(),
drat = col_double(),
wt = col_double(),
qsec = col_double(),
vs = col_integer(),
am = col_integer(),
gear = col_integer(),
carb = col_integer()
)
Parsed with column specification:
cols(
  record_id = col_integer(),
  month = col_integer(),
  day = col_integer(),
  year = col_integer(),
  plot_id = col_integer(),
  species_id = col_character(),
  sex = col_character(),
  hindfoot_length = col_integer(),
  weight = col_integer(),
  genus = col_character(),
  species = col_character(),
  taxa = col_character(),
  plot_type = col_character()
)
mtcars_lapply[[1]] %>% head# A tibble: 6 × 12
model mpg cyl disp hp drat wt qsec vs am
<chr> <dbl> <int> <dbl> <int> <dbl> <dbl> <dbl> <int> <int>
1 Mazda RX4 21.0 6 160 110 3.90 2.620 16.46 0 1
2 Mazda RX4 Wag 21.0 6 160 110 3.90 2.875 17.02 0 1
3 Datsun 710 22.8 4 108 93 3.85 2.320 18.61 1 1
4 Hornet 4 Drive 21.4 6 258 110 3.08 3.215 19.44 1 0
5 Hornet Sportabout 18.7 8 360 175 3.15 3.440 17.02 0 0
6 Valiant 18.1 6 225 105 2.76 3.460 20.22 1 0
# ... with 2 more variables: gear <int>, carb <int>
2.2. for 루프 + assign 조합
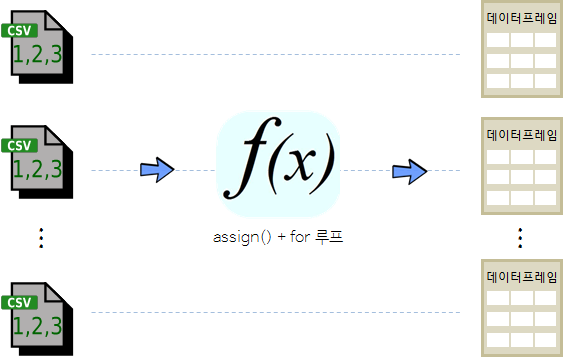
두번째 방법은 assign 함수와 for 루프를 조합하는 것이다. 먼저 .csv 확장자를 패턴으로 갖는 대상을 받아와서, 이를 for 루프를 돌려 read_csv 함수를 적용시켜 파일명과 동일한 데이터프레임으로 저장시킨다.
file_list <- list.files(path=".", pattern = "*.csv")

for(file in file_list) {
  x <- read_csv(file)
  assign(file, x)
}
Parsed with column specification:
cols(
model = col_character(),
mpg = col_double(),
cyl = col_integer(),
disp = col_double(),
hp = col_integer(),
drat = col_double(),
wt = col_double(),
qsec = col_double(),
vs = col_integer(),
am = col_integer(),
gear = col_integer(),
carb = col_integer()
)
Parsed with column specification:
cols(
model = col_character(),
mpg = col_double(),
cyl = col_integer(),
disp = col_double(),
hp = col_integer(),
drat = col_double(),
wt = col_double(),
qsec = col_double(),
vs = col_integer(),
am = col_integer(),
gear = col_integer(),
carb = col_integer()
)
Parsed with column specification:
cols(
model = col_character(),
mpg = col_double(),
cyl = col_integer(),
disp = col_double(),
hp = col_integer(),
drat = col_double(),
wt = col_double(),
qsec = col_double(),
vs = col_integer(),
am = col_integer(),
gear = col_integer(),
carb = col_integer()
)
Parsed with column specification:
cols(
  record_id = col_integer(),
  month = col_integer(),
  day = col_integer(),
  year = col_integer(),
  plot_id = col_integer(),
  species_id = col_character(),
  sex = col_character(),
  hindfoot_length = col_integer(),
  weight = col_integer(),
  genus = col_character(),
  species = col_character(),
  taxa = col_character(),
  plot_type = col_character()
)
# 결과검증
ls(pattern="*.csv")
[1] "mtcars-01.csv" "mtcars-02.csv"
[3] "mtcars-03.csv" "portal_data_joined.csv"
3. 파케이(parquet) 파일과 스파크 클러스터 설정
파케이(Parquet)는 하둡에서 컬럼방식으로 저장 포맷이다. 파케이는 프로그래밍 언어, 데이터 모델, 혹은 데이터 처리 엔진과 독립적으로 엔진과 하둡 생태계에 속한 프로젝트에서 컬럼방식으로 데이터를 효율적으로 저장하여 처리성능을 비약적으로 향상시킬 수 있다.
최초 하둡 파일은 텍스트 형태로 저장되지만, 성능에 문제가 있어 이를 개선하기 위해서 클라우데라 더그 커팅이 trevini, 호튼웍스 오웬 오말리가 ORC 파일 포맷을 제안했다. 특히, ORC 파일은 압축률이 높고 스키마 구조가 우수해 많은 관심을 가졌지만, 하이브에서만 사용가능하다는 단점이 있었다. 하지만, 하둡 오픈 생태계의 경쟁관계에 있던 클라우데라와 호트웍스는 통합하지 못하고 독자 노선을 걷는 사이 트위터에서 파케이를 오픈소스로 공개했다. ORC는 GZIP 코덱을 파케이는 스냅피(SNAPPY) 코덱으로 압축을 했다는 점과 실행환경에서 차이가 날 뿐 서로 지향하는 바는 동일하다. 2
# 1. spark 클러스터 실행
library(sparklyr)
library(dplyr)

# 2. SPARK_HOME 설정
Sys.setenv(SPARK_HOME="C:/spark-1.6.2-bin-hadoop2.6")

# 3. 스파크 클러스터 생성
config <- spark_config()
config[["sparklyr.defaultPackages"]] <- NULL
sc <- spark_connect(master = "local", config = config)
3.1. 파케이(parquet) 파일과 불러오기
파케이 파일은 하둡위에서만 돌아가는 특성으로 인해 인터넷에 아직 많이 공개되어 많이 사용되고 있지 못하다. 따라서 R 데이터프레임(iris, mtcars)을 copy_to 명령어로 스파크 데이터프레임에 대한 참조값을 생성시킨다. 이를 바탕으로 spark_write_parquet 명령어로 로컬 디스크에 파케이 파일을 생성한다. 파일을 열어보면 평소 익숙한 .csv 파일과는 다른 형태로 저장되어 있으나 그리 걱정할 것은 없다.
파케이 파일을 불러오는 명령어는 spark_read_parquet으로 앞서 저장시킨 파일에 대한 동일한 경로명과 파일명을 지정하고 넘기면 스파크 데이터프레임이 생성된다.
# 4. iris 데이터셋 불러오기
iris_tbl <- copy_to(sc, iris)
mtcars_tbl <- copy_to(sc, mtcars)

spark_write_parquet(iris_tbl, "./03.data/iris_tbl.parquet")
spark_write_parquet(mtcars_tbl, "./03.data/mtcars_tbl.parquet")

spark_read_parquet(sc, "iris_tbl_back", "./03.data/iris_tbl.parquet")
spark_read_parquet(sc, "mtcars_tbl_back", "./03.data/mtcars_tbl.parquet")
3.2. 다수 파케이(parquet) 파일과 불러오기
파케이 파일 다수를 불러오는 방식은 여러가지 존재한다. 데모를 위해서 iris 데이터를 50개씩 3등분하고 나서 이를 각기 다른 이름의 파케이 파일로 저장한다. 그리고 나서 와일드 카드(*) 문자를 사용해서 특정 디렉토리에 원하는 모든 파일이 잡히도록 설정한다. 일반적인 파케이 파일 불러오는 방식과 동일하게 명령어를 주면 150개 행이 모두 잡힌 스파크 데이터프레임이 생성된 것이 확인될 것이다.
주의: 스키마 구조가 동일해야 분리된 파케이 파일이 정상적인 스파크 데이터프레임으로 변환이 된다. 특히, 날짜만 달리하는 경우 스키마 구조만 달리하고 일별 정보만 추가로 생성되는 경우 유용하다.
# 5. 다수 parquet 파일

iris_50 <- iris[1:50,]
iris_100 <- iris[51:100,]
iris_150 <- iris[101:150,]

iris_50_tbl <- copy_to(sc, iris_50)
iris_100_tbl <- copy_to(sc, iris_100)
iris_150_tbl <- copy_to(sc, iris_150)

spark_write_parquet(iris_50_tbl, "./03.data/iris_50_tbl.parquet")
spark_write_parquet(iris_100_tbl, "./03.data/iris_100_tbl.parquet")
spark_write_parquet(iris_150_tbl, "./03.data/iris_150_tbl.parquet")

spark_read_parquet(sc, "iris_tbl_back", "./03.data/*.parquet")